Tutorial: Realistische Palmen
Heute haben wir ein sehr schickes Gasttutorial für Euch, das Dioramenbauer und Freizeitpiraten gleichermaßen interessieren könnte.
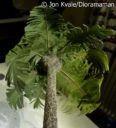
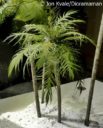
Das Diorama wurde auf der Facebookseite von Dioramaman veröffentlicht, und so sieht es aus:
Since I got so many nice comments and quite a few requests for a more specific ‚how-to-do‘ on these palm trees – well, here it is; The 18 pictures in this post will (try to) show how I make the trees. Short description will be found by each picture.
This is what I’¨ve found most useful as trunk for palm trees – reed. Best time to ‚harvest‘ those are in the Winter as they are dry and easy to handle then.
After harvesting the reed, I Clean off dry parts/leaves – depending on what scale you’re working in there are thinner pieces the higher up on the reed you get
To make them less ‚fragile‘ – they are rather thin and hollow – I cut them just beneath the spot where there was a leave when it was growing
The top – to fasten the palm-leaves in – is made out of styrofoam – cut and sand to shape and glued to the ‚trunk‘
Make more than one at the time….will become useful sometime…
To get a suitable Surface on the trunk and the top section I cover the entire piece with one sheet of a brown paper napkin. Water/glue mixture is perfect for this purpose.
Once dry the Surface get a structure that looks ok to resemble a palm tree trunk. The styrofoam top is also ‚incorporated‘ into the ‚construction‘ in a discreet way.
Applying a thin layer – drybrushing – of tan enamel to the dark Brown Surface wich gives an even more realistic finish
A Close up of the dry brushed top sections
….and the trunks….
Then on to the leaves. Bird feathers! I found the smaller feathers, 4-5-6cm in size, to be the best to use. I don’t know much about birds but I suppose these originated on seagulls. No, there is not a nudist camp with naked seagulls Walking around here – they drop feathers and I pick them up when I find them. Call it second hand – or recycling… 😀
They are small, a Little bent and very thin
Placing them on a glass Surface I apply one layer of green enamel to each side. Yes, you do get a nice coat of green ‚Nail enamel‘ on a couple of finger Nails in this process…
When the paint is dry, I do a touch up layer on the top of the feather/leaf
It takes somewhere around 25-30 feathers to make ONE palm tree….
The bottom of the leaf with the brownish center that is painted after the green is completely dry
And the result – mounting the feathers in the styrofoam top making a small hole in it and gluing the leaf in place
And the result – well they look quite realistic to me! 🙂
Wir bedanken uns für das Tutorial und die Erlaubnis es hier zu teilen!
Quelle: Dioramaman bei Facebook


Hey, das ist ziemlich cool!
Sehr cool!
Wow, sehr geil. Wie einfach man manchmal an perfekte Ergebnisse kommt. Man muss nur drauf kommen.
Genial. Dass da bisher noch niemand drauf gekommen ist. So cool. That’s Tabletop.
Oida, leck Oasch…*ähäm*…..Wahnsinn, ich bin fasziniert.
Das Tutorial hätte ich vor paar Wochen gebraucht, naja, obwohl, da war auch noch kein Winter.
Brown paper napkin: ist das nur eine einfache Serviette oder doch ein bestimmter Stoff?
Ich glaube, dass sind diese grün-braun, manchmal auch grauen Papiertrockentücher, die in öffentlichen Toiletten gerne zum Trocknen der Hände rumliegen.
Höhöhö…die werden bei uns auf der Arbeit wohl jetzt mal fehlen…;)
*hirnbatsch*
Jupp, die kommen eh schon texturiert daher. Schön in Wasser-Bastelleim-Mischung tränken und rumwickeln. Fertig. Danke für den Hinweis.
Wenn man eh um den ganzen Stamm rumwickelt, muss man auch nicht nach einem See oder dergleichen suchen, wo es Schilf gibt. Trockene Ästchen tun es dann auch.
Jetzt muss ich nur noch meiner Frau klar machen, warum ich ein Kissen erlegt und ausgeweidet habe.
Wow krass!
Die ganze Zeit überlege ich, wie er wohl gleich die Blätter macht …
Manchmal ist es sooo einfach, so geiles Zeug zu machen …
Schoenes tutorial! Sehen echt gut aus die Palmen. 🙂
Federn, wie genial ist das bitte?
Richtig tolle Idee mit grandioser Wirkung!
Passt super zu meinem nächsten Projekt und wird sofort getestet!
Danke dafür!
HVM
http://www.hvmworkbench.com
Echt spitze- in Zukunft werden kleine Federn gesucht.
Wow ein tolles Ergebnis…
..allerdings müsste ich dann wohl erstmal Federn im Bastelladen erjagen.
Geniale Idee. Ich denke das wird mal ausprobiert. Sieht besser aus als das Plastikzeugs, was es so gibt.
Sehr geil. So was habe ich schon lange gesucht.
Das wird erst mal gespeichert und bei Gelegenheit nachgebaut.
Super Idee und klasse umgesetzt!